footer
Showing posts with label upcycle. Show all posts

Wednesday, 13 July 2016

and still it rains.....

Where is our summer? We seem to be getting rain every day! Today is quite warm but we are still getting the odd rain shower, in fact it's absolutely bucketing down the noo. So today like many before, I am working in the garden when it's dry then running into the house to work when it rains. The weeds are loving this warm weather and rain though!

Work on the log cabin continues and we are slowly getting near to total completion. Last week I was half down painting one of the sides when the heavens opened and as I sheltered in the greenhouse I could of cried as I watched my hard work run down the side of the cabin wall. I eventually got the whole of the outside painted but it needs another coat, I just need a day of no rain to do it.
We now have insulation down on the floor and the last of the floorboards are going down tonight, so I will soon be varnishing a floor.

cabin studio

I received a couple of car stickers and postcards to start advertising NEOS 2016, so my car now sports a sticker in the back window. I'm getting excited and nervous about being part of this event and really need to find time to get creating some new artwork. 

neos 2016

Last week while nipping in and out of the house between rain showers I decided to give my wee egg safe a makeover. I've had it for a few years now and was getting bored of the cream colour. I had a tester pot of green emulsion, but it was not the green I wanted. I just mixed some acrylic paints into it until I got a colour I was happy with and it goes well with my light green kitchen wall (hard to see in pic). I couldn't find sand paper so used a nail file to rub off some of the paint on the edges and then gave it a wax. the wooden bead that is the wee door knob was then painted a deep dark red. I love it, it looks so much better sitting in my kitchen now.
egg safe makeover

...... and finally here is some summer colour, covered in rain drops. Beautiful red lilies that grow in the garden at the back of the log cabin. At the end of the season I'm going to have to split these so I can have some planted in the garden so I can see them so I can see them while I work in the cabin.

blooming iris

How has your weather been, are you having a summer?

Sunday, 26 April 2015

A wee lampshade make-over

I've had this lamp for a good few years now, bought it from Asda for about £5.  The original base was ceramic but this accidently got smashed so my OH turned a new base out of yew, which I love. The cream lampshade was looking a little grubby and tired so I was going to look out for a new one to buy......


 .... but then I thought why buy a new one, I've got emulsion let's try a thin coat of paint on it.

I unscrewed the lid off a bottle, popped the lampshade onto the bottle neck and screwed the top back on, this gave me something to hold onto and turn the lampshade while painting but it also was a good place to leave the lampsheade while the paint dried.


Time to start painting............


While the paint was drying I cut a strip of the wallpaper I used in the guestroom, because this is where the lamp is going.


Using wallpaper paste I carefully stuck the wallpaper around the lampshade. 

Voila! a wee lampshade make-over that hasn't cost me a penny :)


Tuesday, 21 April 2015

A week of bargain finds

Everyone loves a bargain and everyone that knows me knows I really really love a bargain. This has been a great week of bargains for me.

It all started when our neighbour needed some rubbish taken to our local Recycling Depot, so he and my OH loaded the pick up and off they went. They returned with a garden bench that matches the one we have already, it just needs a clean, a lick of paint and some Danish oil, which we already have, so cost = 0


As decorating of the guestroom is just about complete a trip to one of my favourite local charity shops was called for in the search for a chest of drawers. I couldn't believe my luck when I walked in and there was this lovely big old pine chest of drawers that just needed a good clean and a coat of wax. It couldn't fit into the room any better, I just love it, even though this cost £50 it's still a bargain, it's solid and has a lot of life left in it and I couldn't buy a new chest of drawers like this for that price :)


At the same charity shop I saw a pair of cream lined curtains for £6, but as we were going to do some shopping and pick the chest of drawers up on our way home I thought I'd wait and buy them then. 
When we went back to pick up the chest of drawers the curtains were gone!

Lesson learned here - if you see a bargain buy it there and then!

While the Chest of drawers was being loaded onto the pick up I dug a little deeper in the corner of the charity shop, then realised I wasn't meant to get the cream curtains because I'd just found brand new, still in packaging, lilac lined curtains for £10, I instantly knew these would go perfectly with the wallpaper in the guestroom.

Lesson learned here - dig deeper and you may find an even better bargain!

I also picked up 3 feather filled cushions with cream textured fabric covers for a £1 each


The room is really starting to come together now. I found tie back hooks in a box where we just keep stuff that we might need one day, so I'm on the look out now for bargain tie-backs for the curtains or I might make them. I'm also on the look out for a purple cushion and at last the bed is built.


Then to round off the bargain week, we popped into another charity shop yesterday as we were passing, where I got a telescopic monopod for my camera for £1 and 2 little ducks (which I wasn't really needing, but I liked them) to sit on the little shelf on my dresser for 50p


All in all its been a great week of bargains, a few sunny days, even had our first bbq and the swallows are starting to come back so summer is definitely on its way :)

How has your week been?


Saturday, 14 March 2015

The same but different

I've now painted the other chair that's the same as the chair I sit on at my computer, but as I said in a previous post it was going to be a different colour.

I have a pine bookcase in the room that has been painted duck egg blue and my fireplace wall has been painted in this colour too, but with a gradient starting dark at bottom and gradually getting lighter towards the ceiling. I find this quite a calm cool colour and as I wanted my desk and chair to be bright and the statement pieces of furniture in the room I decided to paint the other chair duck egg blue.

It seems to work, what do you think?


I also added the same script paper circles to the back of the blue chair.


Quite a change from how these 2 chairs started out


I'm now on the look out in the local charity shops for a couple more chairs to put around my work/dining table. Once I have these the table and chairs will all get a wee lick of paint too. I'd like another pair of chairs but they don't have to be like the pair of chairs I already have........ Dare to be different :)


Friday, 6 March 2015

My desk was too small so....

..... I found a new one

This is the desk that I have been using for a while, it was an old dressing table that I found in one of the out buildings which I upcycled with a coat of paint and new hare drawer knobs. I loved the shape of this, the colour and the hares, but it was far too small and no matter what I did the drawers were always sticking.


So I was on the look out for a new piece of furniture I could upcycle and use as my desk. I love to go and check out whats available at local charity shops with my favourites being Magpie in Banchory and Inverurie. I found my new desk at Magpie in Banchory and it cost just £45, it has plenty of drawers and being solid pine it was sturdy and ideal for my purpose and for me to upcycle as I hated the dark antique varnish it was covered in.


This is quite a large piece of furniture and at first I thought it would be too much to paint it the same colour as the smaller desk. Then I thought to myself "hey it's just paint, if I don't like it I can paint it again!" ......where had my confidence in colour gone?

I mixed my own chalk paint, looked at various recipes on the internet for this and tried a couple of different ones, but this is the one I prefer.

Chalk Paint Recipe 

1 part Calcium Carbonate (I purchased mine through Amazon)
2 parts paint (any paint, I used Silk Emulsion by Crown and the colour is So Sweet)

Mix together well then paint

I gave the desk and drawers 2 coats of paint.
I had thought about buying new drawer knobs for this but decided I really didn't want to spend any more money and would complete this project with only things that I already had. I mixed a small amount of chalk paint using black acrylic and Calcium Carbonate and painted the knobs and the bun feet on the desk.


I didn't want the drawer knobs to be plain black so a quick search through my craft stash and I found this script paper in my Hot off the Press - Paper Pizazz Heritage book. I cut circles from the paper slightly smaller then the knobs and stuck the paper down with PVA glue.

Once the glue was dry I gave the knobs a couple of coats of quick drying acrylic satin varnish.


As I didn't have enough wax, but had plenty of acrylic varnish I gave the desk and drawers a couple of coats of varnish to seal them. I can always give the desk a wax in future when I buy some more wax.
My finished desk and I love the colour :)


I also have 2 old paint covered chairs, one of which I use when I'm on my computer. These were given to us by a friend so didn't cost anything but were in need of being brightened up a little.


I wanted one of the chairs to match my desk so gave it a couple of coats of the same paint that I used on my desk. I also painted the bottom of the legs black to match the desks bun feet.


As a final little touch I cut 3 circles from the script paper and stuck these to the back of the chair before giving it a couple of coats of varnish.


The completed desk and chair


I love it and can't wait to be sitting there working on my computer.

I'm working on the other chair and will post a photo of this soon as this is going to be a little different. Just because they are a pair of chairs doesn't mean they have to be exactly the same :)
I will also be using the hare knobs (from my old desk) on another project soon


Sunday, 30 September 2012

I'm on a roll.....

...... been busy doing college stuff and another wee make over and look ..... its another wee blog post :)
This time the make over was on the toy box where I keep my grandkids toys. It has served us well as a cheap pine chest that can also be used as an extra coffee table or seating, but it was time to freshen it up. A quick lick of Duck Egg Blue paint, a branch and 3 birds cut from scrapbook paper, a bird each for Kian, Kailub and Ellie-Louise. A light sanding to distress it slightly and a couple of coats of acrylic varnish and voila! I think it looks so much better now, just hope my grandkids like it

Thanks for popping by
Until next time......whenever that may be.....bye :)

Friday, 28 September 2012

since my last post a........

...... lot has happened. I no longer live in a croft in the beautiful countryside of Aberdeenshire, I have moved back to Fife to be nearer my family. I have also started back at college where I'm studying Computer Arts and Digital Design, some of my college creations can be seen here on my Flickr page. I've also bought my very first car and am slowly getting used to driving it.

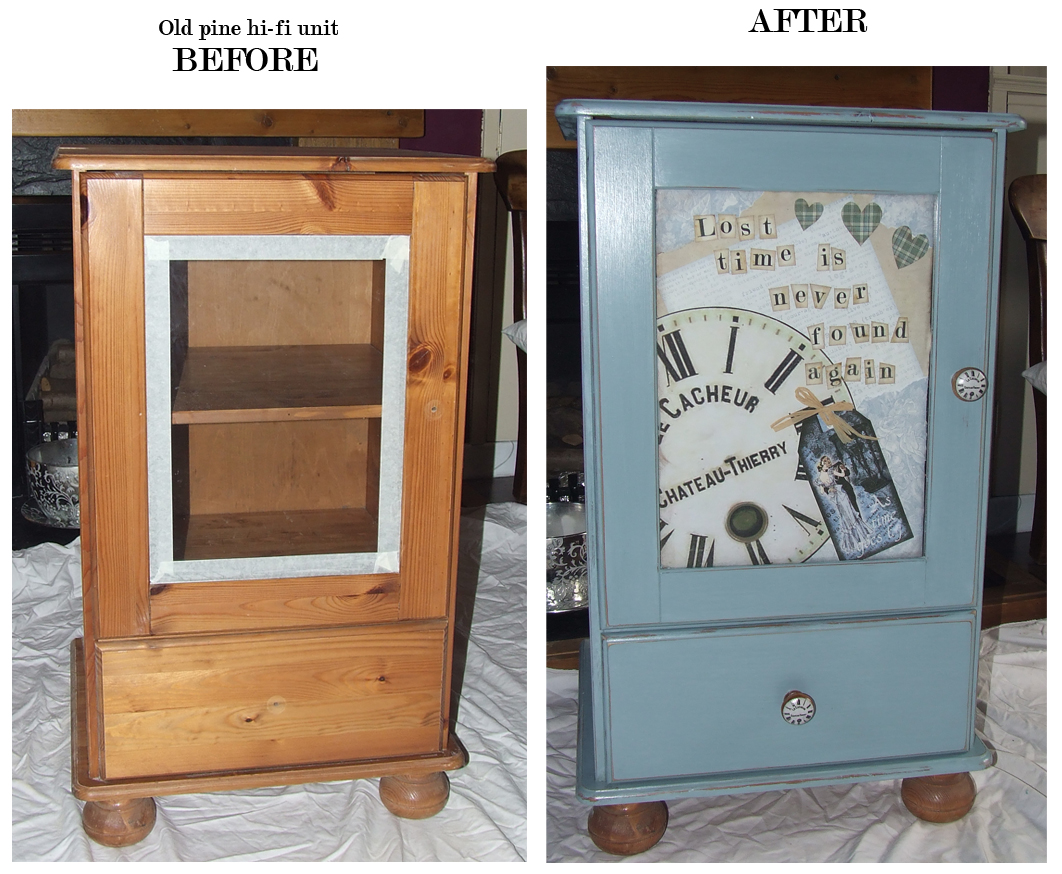
Settling into my house and got some decorating to do to make it feel like my home, but loving being back in Fife. I am bored of my old pine furniture and being a skint student can't afford new stuff so I have started on a big make over. So far my old pine hi-fi cupboard has been beautified and my old coffee table. The cupboard has been painted in Duck Egg Blue and slightly distressed, then behind the glass is a collage I created on a piece of cardboard box. The handles have clock faces on them which I printed off then stuck to the old pine handles and gave them a couple of coats of varnish.

The coffee table was a car boot buy about 20 years ago and cost £5 and it has had a few makeovers in its time. It's legs have been given a new coat of paint and lightly distressed and the top now has a large piece of torn old ordnance survey map on it, which cost me 70p from Ebay.

I tore the map just smaller than the table top and glued it down with pva glue. The were a few bubbles and the folds of the map didn't lie completly flat, so once it was dry I gently rubbed it with fine sandpaper which gave it some worn areas and helped the torn edges blend into the table top. A couple of coats of acrylic varnish and now when I sit and have a coffee I can see where I used to live and all the places I used to visit.

I'm on the look out now for a cheap pine dresser to give the shabby chic treatment to, as I sadly had to leave my dresser behind when I moved. I've seen a couple but they just weren't what I'm looking for, the right one will come my way eventually.
I have also added a few more printable digital downloads to my online shop the latest of which is a Vintage Stars and Stripes Bunting for Thanks Giving and Tag Sheet. The wording on the bunting can be changed, just contact me.

hopefully I will be blogging more frequent again soon lol 

Monday, 21 May 2012

What I did with an old car manual...

I had been looking for a book that was the correst size for what I had planned, but alas none were to be found. So an old car manual came to the rescue and was cut down to size (used a band saw for this ). But what was I needing it for I hear you ask? Well......

 .....it now looks like this after being covered in paper, lined with felt, some elastic (an old bra strap lol) to keep it shut, my tablet now has a nice cover to keep it clean and safe. The tablet is held in place with a little velcro.
You can find lots of tutorials on the internet for making covers for iPads, Tablets and e-readers

Wednesday, 28 December 2011

When snowflakes turn out to be....

.... stars!!!! How can that be? While doing my grocery shopping online befor Christmas I noticed Asda had some snowflake decortions at a very reasonable price so I added them to my order. My order was delivered but the snowflakes had sold out so they substituted them with star decorations. When I saw them they were the most hideous dark glittery stars I have ever seen, so a quick soak in water and the glitter was removed revealing a grey plastic star, so out came the old torn book pages and the glue and I covered the stars. I then rubbed a red ink pad along the edges and the raised centers, now I had stars that were more to my liking.
This got me thinking about what else I could make as Christmas decorations as Christmas was looming ever nearer, but I didn't want to spend much so off I went out into the old sheds to see what I could find.........
I put these finds together with a poinsetta, one of my stars, a couple of candy canes and a wee spray of fake snow and voila.....a festive display to sit in the corner of my hall. With the freshly cut pine logs there is a lovely smell as you enter the croft asthey start to dry out ready for the fire.


This just left the fireplace to be decorated, I usually make a very traditional holly and ivy garland, but this year I wanted something just a little different. I still made a quite traditional display of some spruce and pine foliage and cones which I gathered while out walking the dogs after a storm. I wrapped a cyclimen in a pot in tissue paper to match the tea light lanterns I made a couple of days ago. I then used a deers antler to hang a couple of stars and sparkly decorations from.  To tie in with the old book page stars I used a 1" punch to cut lots of circles which I just stitched together on my sewing machine to make a paper chain to drape over the mirror.


To finish the fireplace off I filled a jar with more pine foliage, glued some cones to wire and arranged in the foliage. I then placed this in a basket and added a few logs and cones to hide the jarand another wee spray of fake snow. The only trouble is Shug, one of our dogs, has taken a liking to chewing the cones, so I am forever having to replace cones in the basket :-)

I hope everyone had a Merry Christmas and you are all looking forward to the New Year.

Thursday, 15 December 2011

A quick n easy Christmas make...

.... that is recycling too :-)

I was wanting something different from just candles on my fireplace this year so I made myself some lanterns. I used 3 small jars (one was a small seafood sauce jar to give you an idea of the size) and some tissue paper that I had saved from the parcel my new dress arrived in. I cut squares, sat the jar in the middle, pulled up the edges and tied with raffia. I trimmed the edges and opened them up slightly so they didn't catch fire from the tea lights in the bottom of the jars. They look ok in the day........

.....but look so much better in the evening when they are lit


I will have to decorate the rest of the fireplace now........ I wonder what I will do?